
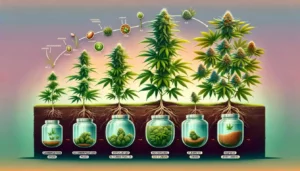
The journey of cultivating cannabis is a fascinating blend of art and science, particularly during the flowering stage. This phase is pivotal as it transitions your plants from vegetative growth to the development of buds. This guide delves into the flowering stage, providing a detailed week-by-week overview. Our goal is to empower growers with the knowledge to optimize yield and potency, ensuring a successful and rewarding harvest.
Week 1-3: The Onset of Flowering and the Stretch Phase
Transition to Flowering
- The flowering stage is initiated by changing to a 12/12 light cycle, giving your cannabis plants 12 hours of light and uninterrupted darkness each day. This shift signals to the plants that the season is changing, essentially mimicking the approach of winter.
- This period is marked by a significant growth spurt in your plants, often referred to as “the stretch.” During this time, many cannabis strains can double in height, preparing the structural integrity for the upcoming bud formation.
Key Developmental Changes
- This stage is crucial for setting the foundation for successful bud development. The rapid vertical growth requires a stable and supportive environment to ensure the plants can bear the weight of the buds that will develop in the coming weeks.
- Internodal spacing will start to expand, and you may notice the development of new nodes. These nodes are critical as they will be the sites of bud formation.
Adjusting Care Techniques
- As your plants enter this stage, it’s essential to adjust your care techniques. This includes fine-tuning your watering schedule, as the increased growth rate will likely increase water uptake.
- Nutrient needs will also shift during this phase. Reduce nitrogen levels, which were crucial during the vegetative phase, and increase phosphorus and potassium, which are essential for bud development.
Navigating Challenges
- Be vigilant for signs of stress, such as yellowing leaves or stunted growth, which can be indicative of nutrient deficiencies or environmental imbalances.
- Monitor and adjust environmental conditions like humidity and temperature. The ideal conditions depend on your specific strain but maintaining a stable environment is key to avoiding stress that can impact growth.
Week 3-4: Formation of Budlets
Early Bud Development
- During weeks 3 to 4, the rapid height increase will begin to slow down, marking a shift in the plant’s energy from vertical growth to bud development.
- At this stage, the first signs of bud formation, or “budlets,” start appearing at the nodes. These are small and characterized by white, wispy pistils, indicating the early stage of flowering.
Environmental Adjustments
- As the plants transition from vegetative growth to flowering, they require different environmental conditions. This includes adjusting the light spectrum to a more red wavelength if using LED lights, which encourages bud development.
- Continue to monitor and adjust the humidity and temperature. Lowering the humidity gradually during this phase can help reduce mold and mildew risk as the buds form.
Nutrient Requirements
- The nutrient requirements during this phase are critical. The plants will benefit from a flowering fertilizer high in phosphorus and potassium. These nutrients are essential for bud formation and development.
- Monitor the pH of your soil or hydroponic solution diligently. An imbalanced pH can lock out essential nutrients, hindering bud development.
Monitoring Plant Health
- Regularly inspect your plants for signs of pests or diseases. The early flowering stage can be particularly attractive to pests like spider mites.
- Be observant of your plants’ overall health. Discoloration, drooping, or curling leaves can indicate issues that need to be addressed promptly to ensure healthy bud development.
Week 4-6: Buds Start Fattening
Intensified Bud Growth
- This period is characterized by the buds becoming increasingly more substantial and dense. The white pistils will become more prominent, and the bud sites will start to fill out and expand.
- The plant’s energy is now almost entirely directed towards bud development. This shift is noticeable in the physical appearance of the buds, which become visibly fuller and more resinous.
Continued Environmental Control
- Lighting continues to play a crucial role. Ensure your plants receive uninterrupted darkness during the night cycle to maintain the flowering process.
- Maintain a slightly cooler temperature during this phase to encourage resin production and maintain vibrant coloration in the buds.
Nutrient Adjustments
- As the buds fatten, they require a continued supply of phosphorus and potassium. Be cautious with nitrogen application, as excessive nitrogen can lead to leafy growth at the expense of bud development.
- Consider adding bloom boosters to your feeding regimen. These are typically high in phosphorus and potassium and can significantly impact bud size and quality.
Support and Maintenance
- As the buds grow, they can become heavy, leading to branches bending or breaking. Provide support with stakes or trellises to ensure that your plants can support the weight of the developing buds.
- Monitor the moisture levels in the buds, as dense buds can be prone to mold or mildew. Ensure good air circulation around the plant to keep humidity levels in check.
Week 6-8: Buds Ripen and Pistils Darken
Maturation of Buds
- During these final weeks, the focus is on the maturation of the buds. The pistils will begin to darken and curl inward, signaling the nearing of the harvest.
- Trichome development reaches its peak, turning from clear to milky or amber. These trichomes are rich in cannabinoids and terpenes, contributing to the potency and aroma of cannabis.
Final Nutrient and Watering Adjustments
- This is the time to start considering the flushing of your plants, especially if you are growing in soil. Flushing involves watering your plants with plain water to remove any residual nutrients, improving the flavor and smoothness of the final product.
- Reduce nitrogen to minimal levels and maintain phosphorus and potassium to support the final stages of bud ripening.
Preparing for Harvest
- Start preparing for the harvest by gathering the necessary tools and equipment. This includes sharp scissors or pruners, drying racks, and storage containers.
- Begin to monitor the trichomes closely using a magnifier or jeweler’s loupe. The ideal harvest time varies depending on the desired effects, with milky trichomes indicating peak THC levels or waiting until they amber for a more sedative effect.
Environmental Monitoring
- Maintain a stable environment to avoid stressing the plants during these crucial final weeks.
- Be particularly vigilant about humidity control to prevent mold, as the dense buds are more susceptible to moisture retention.
Week 8 and Beyond: Preparing for Harvest
Harvest Readiness
- Most strains are ready for harvest at this stage. The pistils should be mostly darkened, and the trichomes cloudy or amber.
- The leaves, especially those near the buds, may begin to yellow and die off. This is normal as the plant redirects its energy to the buds.
Final Preparations for Harvest
- Gradually reduce watering in the days leading up to the harvest to help concentrate flavors and ease the drying process.
- Plan your harvest carefully. Harvesting in stages can be beneficial if the lower buds need more time to mature.
Harvesting Process
- Harvest early in the morning when the plant’s terpene profile is at its peak.
- Be gentle with the buds during harvesting to preserve trichomes and avoid loss of potency.
Post-Harvest Care
- Dry the harvested buds slowly and evenly. Proper drying and curing are critical for the final quality of your product.
- Store the cured buds in a cool, dark place in airtight containers to preserve their potency and flavor.
Nutrient Management During Flowering
Nutrient Needs in the Flowering Stage
- The flowering stage demands a shift in nutrient composition. Plants require less nitrogen and increased levels of phosphorus and potassium. This change supports bud development and strengthens the plant’s structure to support the weight of the buds.
- Each week, assess the plant’s nutrient needs based on its growth and appearance. Yellowing leaves can indicate a nitrogen deficiency, while dark, curled leaves may suggest nutrient burn.
Macronutrients and Micronutrients
- Macronutrients (N-P-K) are crucial but don’t overlook micronutrients like calcium, magnesium, and sulfur. These support various plant processes, including photosynthesis and cell structure.
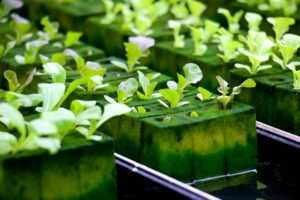
- Consider using supplements that provide a balanced micronutrient mix, especially in hydroponic setups where soil-based micronutrients are absent.
Adjusting Nutrient Levels
- Monitor plant response to nutrient changes. Stunted growth or leaf discoloration can signal the need for adjustments.
- Use a well-balanced flowering nutrient solution and adjust its concentration based on the plant’s size and the growth stage. Start with lower concentrations to prevent nutrient burn.
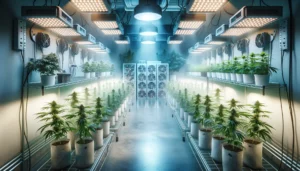
Lighting Requirements and Adjustments
Importance of Light Spectrum Changes
- The flowering stage requires a shift in the light spectrum towards the red end. This mimics the natural sunlight in autumn and encourages bud development.
- Use grow lights that offer a full spectrum or add supplemental lighting that enhances the red wavelengths.
Light Intensity and Duration Recommendations
- Maintain high light intensity, as cannabis plants require substantial light to produce energy for bud growth.
- Stick to a strict 12/12 light cycle, providing 12 hours of light and 12 hours of uninterrupted darkness.
Common Lighting Issues
- Beware of light burns, which can damage leaves and buds. Ensure lights are at the correct distance from the canopy.
- If plants receive any light during the dark period, it can disrupt their flowering cycle, potentially reverting them to the vegetative stage or causing hermaphroditism.
Watering and pH Balancing
Best Practices for Watering
- During flowering, cannabis plants often require more water due to increased metabolic activity.
- Water when the top inch of soil feels dry. Overwatering can lead to root rot, while underwatering can stress the plant, affecting bud development.
Importance of pH Level Maintenance
- Maintain a pH level between 6.0 and 7.0 for soil and around 5.5 to 6.5 for hydroponic systems.
- Regularly check and adjust the pH of your water/nutrient solution to ensure optimal nutrient uptake.
Signs of Watering Issues
- Overwatering can lead to droopy, overburdened plants with yellowing leaves.
- Underwatered plants will have dry, curled leaves. Adjust your watering schedule based on these signs.
Environmental Control: Temperature and Humidity
Optimal Ranges for Flowering
- Maintain daytime temperatures around 75-80°F (24-27°C) and nighttime temperatures slightly lower.
- Gradually reduce humidity to about 40-50% during flowering to reduce the risk of mold and mildew.
Adjusting Environmental Conditions
- Use fans, air conditioners, and dehumidifiers to control the grow room environment.
- Monitor closely and make adjustments as needed to keep within the optimal ranges.
Handling Environmental Stressors
- Watch for signs of heat stress, such as wilting or leaf curling. Adjust temperatures accordingly.
- Ensure proper ventilation to maintain a consistent environment and prevent stagnant air, which can foster pests and diseases.
Pest and Disease Management
Identifying Common Pests and Diseases
- Be on the lookout for signs of infestations, such as spider mites, aphids, and mold.
- Regular inspections can help catch issues early when they are easier to manage.
Control Methods
- Employ organic pest control methods like neem oil or insecticidal soaps for minor infestations.
- For severe problems, carefully selected chemical pesticides can be used, although they should be avoided close to harvest.
Healthy Environment Strategies
- Maintain cleanliness in the grow area to prevent pest and disease outbreaks.
- Use preventive measures such as sticky traps and companion planting to deter pests.
Advanced Flowering Techniques
Training Techniques
- Techniques like Low-Stress Training (LST) involve gently bending and tying branches to spread the canopy and expose more bud sites to light.
- High-stress training (HST), such as supercropping, is more aggressive and should be done carefully to avoid overstressing the plant.
Supplements and Enhancements
- CO2 enrichment can significantly boost bud growth by enhancing photosynthesis.
- Bloom boosters, rich in phosphorus and potassium, can be added to increase bud size and density.
Yield Maximization Strategies
- Defoliation involves removing some leaves to improve light penetration and air flow around the buds.
- Lollipopping, or removing lower growth that receives little light, directs the plant’s energy to the top colas.
Preparing for Harvest
Harvest Preparation Steps
- Begin flushing the plants with plain water 1-2 weeks before the planned harvest to improve the taste and quality of the buds.
- Gather the necessary tools for harvesting, such as pruning shears and drying racks.
Timing for Optimal Potency and Flavor
- Use a jeweler’s loupe to inspect trichomes. Harvest when they turn from clear to milky for peak THC levels, or wait until they turn amber for a more sedative effect.
- Plan your harvest based on the strain’s characteristics and your personal preferences.
Conclusion
Successfully navigating the flowering stage is key to a fruitful cannabis harvest. This guide offers a thorough understanding of each phase, providing detailed advice to optimize your cultivation process. Remember, each strain and growing setup is unique, so stay adaptable and attentive to your plants’ needs. Happy growing!
Frequently Asked Questions (FAQs)